myTextView
Il widget myTxtView serve a visualizzare il contenuto del widget TextBuffer che memorizza del testo con attributi associati. In altre parole la base di un editor di testo.
myTxtView
Oltre ai soliti attributi come dimensioni, tipo caratteri, viene istanziato il TextBuffer che è la base del nostro TextView e anche myScrolled che vedremo dopo.
#-----------------------------------------------------------------------------
# myTextView
#-----------------------------------------------------------------------------
def myTxtView(name='myTxtView', colo='black',
					widt=300, heig=70,
					font="courier 9", edit=False,
					left=1, righ=1, bord=3,
					bFra=1, sFra=Gtk.SHADOW_ETCHED_OUT,
					tFra='v', aFra=[False,False,1] ):
	""" crea una textView all'interno di un frame

		-> name nome assegnato alla label del Frame
		-> widt larghezza da assegnare allo Scrolled
		-> heig altezza da assegnare allo Scrolled
		-> font font da utilizzare
		-> edit abilta la modifica
		-> left margine sinistro sul textView
		-> righ margine destro sul textView
		-> bord margine esterno dello scroolbar
		-> bFra bordo riservato all'esterno
		-> sFra tipo di cornice
		-> tFra tipo di contenitore v/h
		-> aFra attributi contenitore
	"""
#textBuffer
	buff = Gtk.TextBuffer()
#textView
	# istanzio un TextView
	text = Gtk.TextView(buffer=buff)
	text.show()
	text.modify_font(Pango.FontDescription(font))
	text.set_property ('can-focus', edit)
	text.set_editable(edit)
	text.set_cursor_visible(edit)
	# text.set_sensitive(edit)
	# text.set_overwrite (True)
	# text.set_wrap_mode(True)
	text.set_left_margin(left)
	text.set_right_margin(righ)
	#  blocca il size visibile con lo scroll
	#(width, higth)
	#text.set_size_request(100,100)
#myScrolled
	scro = myScrolled(obje=text, bord=bord,
					  widt=widt, heig=heig,
					  shad=Gtk.SHADOW_ETCHED_IN,
					  poli=(Gtk.POLICY_AUTOMATIC, Gtk.POLICY_AUTOMATIC))
#tag
	buff.create_tag("blaWhi",foreground="black",background="white")
	buff.create_tag("redWhi",foreground="red",background="white")
	buff.create_tag("greWhi",foreground="green",background="white")
	buff.create_tag("bluWhi",foreground="blue",background="white")
	buff.create_tag("redBla",foreground="red",background="black")
	buff.create_tag("whiBlu",foreground="white",background="blue")
	cTag = ["blaWhi",]
	# curs = buff.get_end_iter()
#myFrame
	# fram, [labe, xBox]
	fram, othe = myFrame(name=name, obje=scro, colo=colo,
						 bord=bFra, shad=sFra, tBox=tFra, aBox=aFra)
#callback
	def clear(*args):
		""" pulitura del textBuffer """
		sta, end = buff.get_bounds()
		buff.delete(sta, end)
		# curs = buff.get_end_iter()
	def read(*args):
		"funzione di lettura dell'intero buffer"
		sta, end = buff.get_bounds()
		return buff.get_text(sta, end)
	def write(*msg):
		"funzione di scrittura per il redirect"
		for ele in msg:
			if len(ele) > 0:
				writeTag(ele, cTag[0])
	def writeTag(str="", tag="blkWhi"):
		"inserisco la stringa nel buffer"
		#ite = curs
		ite = buff.get_end_iter()
		# printD("\nite: %d %d" %(ite.get_line(), ite.get_line_offset()))

		# inserisco testo con tag
		buff.insert_with_tags_by_name(ite, str, tag)
		# aggiorno lo scrollbar
		text.scroll_mark_onscreen(buff.get_insert())
		# risolve il bug della prima scrittura
		# text.grab_focus()

		if 0:
			if '\r' in str:
				ite.backward_line()

		# # aggiorno le linee acquisite
		# num = buff.get_line_count()
		# printD("%s(%d)" %(str, num), '')

	def test(*msg):
		# sovrascrittura del metodo per permettere la scrittura con i colori
		sys.stdout = write
		print "%s" %msg
		# torno al default
		sys.stdout = sys.__stdout__

	# def cursor(*args):
	# 	x, y = text.get_pointer()
	# 	printD("\na) %d %d" %(x,y))
	# 	x, y = text.window_to_buffer_coords(Gtk.TEXT_WINDOW_WIDGET, x, y)
	# 	printD("\nb) %d %d" %(x,y))
	# 	# if text.get_iter_at_location(x, y).has_tag(errTag):
	# 	# # Code here
# <-
	#          0,   1,   2,   3,   4,    5,    6,       7
	# fram,[labe,xBox,buff,text,cTag,clear,write,writeTag]
	return fram,[othe[0],othe[1],buff,text,cTag,clear,write,writeTag] #,cursor]
Notate che nell’istanza del TextBuffer definiamo dei tags che altro non sono degli attributi che possiamo associare a delle aree del buffer. In questo caso servono a cambiare i colori di fondo e del testo.
#tag
	buff.create_tag("blaWhi",foreground="black",background="white")
	buff.create_tag("redWhi",foreground="red",background="white")
	buff.create_tag("greWhi",foreground="green",background="white")
	buff.create_tag("bluWhi",foreground="blue",background="white")
	buff.create_tag("redBla",foreground="red",background="black")
	buff.create_tag("whiBlu",foreground="white",background="blue")
	cTag = ["blaWhi",]
Interessante notare le callbacks definite che ci aiuteranno nelle operazioni di
Pulisci il buffer
	def clear(*args):
		""" pulitura del textBuffer """
		sta, end = buff.get_bounds()
		buff.delete(sta, end)
Leggi il buffer
	def read(*args):
		"funzione di lettura dell'intero buffer"
		sta, end = buff.get_bounds()
		return buff.get_text(sta, end)
Scrivi nel buffer
	def write(*msg):
		"funzione di scrittura per il redirect"
		for ele in msg:
			if len(ele) > 0:
				writeTag(ele, cTag[0])
Scrivi nel buffer assegnando il tag
	def writeTag(str="", tag="blkWhi"):
		"inserisco la stringa nel buffer"
		#ite = curs
		ite = buff.get_end_iter()
testTxtView
Come possiamo vedere dal test la cosa importante e’ dare una referenza agli oggetti che ritorna la nostra istanza.
def testTxtView(self):
#myTxtView
	#          0,   1,   2,   3,   4,    5,    6,       7
	# fram,[labe,xBox,buff,text,cTag,clear,write,writeTag]
	fram,othe = myTxtView(name='myTxtView', colo='blue',
								widt=400, heig=200,
								font="courier 9", edit=True,
								left=1, righ=1, bord=3,
								bFra=1, sFra=Gtk.SHADOW_ETCHED_OUT, tFra='v' )
	# insert object in apllication
	self.vBox.pack_start(fram, False, False, 1)

	# referenzio gli attributi
	self.cTag = othe[4]
	# referenzio i metodi
	self.clear = othe[5]
	self.write = othe[6] # *msg
	self.wriTg = othe[7] # str="", tag="blaWhi"
	# self.curs  = othe[8]

	#self.clear()
	# imposto colore di default
	self.cTag[0]="greWhi"
	# scrivo qualcosa col colore di default
	self.write('ciao mondo')
	# cambio colore al volo
	self.wriTg(' crudele\n', "redWhi")
	# self.write(' crudele\n')
	# self.curs()
	self.write('by Orcim...\r')
	# self.curs()
	self.write('uffi')

	if 1:
		# chiamo la pulizia del buffText dopo N sec
		# reference del Tick (time out every mSec)
		GObject.timeout_add(3000, self.clear)
		#GObject.timeout_add(2000, call[2], "io sono una print\n")
# <-
	return fram
Solo quelli che vogliamo usare successivamente.
	# referenzio gli attributi
	self.cTag = othe[4]
	# referenzio i metodi
	self.clear = othe[5]
	self.write = othe[6] # *msg
	self.wriTg = othe[7] # str="", tag="blaWhi"
Se proviamo ad avviare il test otterremo quanto segue.
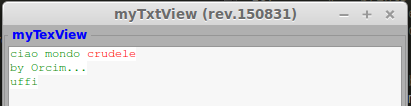
testTxtView in esecuzione.
timeout
Per arricchire il nostro test ho voluto inserire un pezzo di codice che viene molto utile quando si vuol eseguire qualche metodo in modo differito.
	if 1:
		# chiamo la pulizia del buffText dopo N sec
		# reference del Tick (time out every mSec)
		GObject.timeout_add(3000, self.clear)
myScrolled
#-----------------------------------------------------------------------------
# myScrolled
#-----------------------------------------------------------------------------
def myScrolled(obje=None, bord=1,
			   widt=100, heig=100,
			   shad=Gtk.SHADOW_ETCHED_IN,
			   poli=(Gtk.POLICY_AUTOMATIC, Gtk.POLICY_AUTOMATIC)):
	""" crea un scroller con gli attributi passati

		-> obje oggetto da inserire
		-> bord margine esterno dello scroolbar
		-> widt ampiezza
		-> heig altezza
		-> shad tipo di cornice
			Gtk.SHADOW_NONE, Gtk.SHADOW_IN, Gtk.SHADOW_OUT,
			Gtk.SHADOW_ETCHED_IN, Gtk.SHADOW_ETCHED_OUT
		-> poli politiche di visibilita delle barre di scorrimento
			(horizontal,vertical)
			POLICY_AUTOMATIC whether you need
			POLICY_ALWAYS leave the scrollbars
	"""
#scrolledWindow
	# create a new scrolled window.
	scro = Gtk.ScrolledWindow()
	scro.show()
	scro.set_border_width(bord)
	# width, height
	if (type(widt) is type(1)) and (type(heig) is type(1)):
		scro.set_size_request(widt, heig)
	# shadow
	scro.set_shadow_type (shad)
	# police
	scro.set_policy(*poli)
	if obje != None:
		scro.add(obje)
# <-
	return scro
Questo è un oggetto per semplicare l’istanza e l’applicazione delle barre di scorrimento. Potete notare la sua applicazione nel codice precedente in myTxView. Funge da contenitore!
Package
La struttura aggiornata del nostro package è la seguente:
l00_start.py
l01_startGtk.py
my00init.py
myWidg/
  __init__.py
  my00init.py
  my00initGtk.py
  my01Box.py
  my02Label.py
  my02Entry.py
  my02TxtView.py
  myWind.py
  myApp.py
Per scaricare la nuova versione 20150831.zip
Saluti
Bene anche questo post è finito.
Nel prossimo post vedremo gli oggetti button.
Ciao alla prossima. (stay tune!)