myRadioButton
Il widget radio button viene usato quando si ha la necessità di selezionare uno degli N valori presenti. Un numero intero indica la selezione.
myRadButton
Per dover di cronaca il widget myRadButton come definito qui sotto a poco senso, visto che ha una sola scelta. L’ ho fatto per mantenere una certa omogeneità nelle definizioni rispetto agli altri oggetti.
#-----------------------------------------------------------------------------
# myRadioButton
#-----------------------------------------------------------------------------
def myRadButton(name='myRadButton',
				chil=None, valu=0,
				call=None, data=['dati']):
	""" crea un bottone di tipo radio
		alla premuta del bottone viene eseguita la callback associata

		-> name nome associato alla label
		-> chil widget di riferimento
		-> valu indica il valore selezionato
		-> call funzione da eseguire su evento
		-> data dati da passare alla funzione
	"""
	#callback debug
	def on_clicked(widg, *data):
		# descrivo solo quello attivato
		try:
			if widg.get_active():
				print data[0]
		except:
			pass
#radioButton
	# istanzio un bottone
	butt = Gtk.RadioButton(name)
	# lo rendo visibile
	butt.show()
	# attivo il button
	butt.set_active(valu)

	# in assenza di callback usa quella di debug
	if call == None:
		call = on_clicked
	butt.connect('clicked', call, *data)
# <-
	return butt, call
myRadButList
Questo è il primo widget utile di questo modulo. L’ attributo valu durante l’ istanza definisce quale bottone deve essere selezionato. Il valore 0 indica il primo oggetto, 1 il secondo e così di seguito.
#-----------------------------------------------------------------------------
# myRadioButtonList
#-----------------------------------------------------------------------------
def myRadButList(name=["One","Two","Three"],
				 chil=None, valu=0,
				 call=None, data=['dati'],
				 tBox='h', aBox=[False, False, 1]):
	#callback debug
	def on_clicked(widg, ind, *data):
		ena = widg.get_active()
		if ena:
			print "a", "%05s" %widg.props.label.replace('_',''),
			print ind, data

	# in assenza di callback uso quella di debug
	if call == None:
		call = on_clicked

	# funzione che istanzia oggetti tipo
	def myList(ind):
#myRadButton
		# butt,[call,]
		return myRadButton(name=name[ind],
						   chil=chil, valu=False,
						   call=call, data=[ind, data])
#myBoxList
	# xBox, [butt,call] * N
	obje, othe = myBoxList(name=name, tBox=tBox,
						   aBox=aBox, func=myList)
	# prendo come capogruppo la prima istanza
	gro = othe[0][0].get_group()
	for ele in othe[1:]:
		# imposto il capogruppo alle altre istanze
		ele[0].join_group(gro[0])
	# rendo attivo il button
	if type(valu) == type(1):
		othe[valu][0].set_active(True)
# <-
	return obje, othe
testRadButList
def testRadButList():
#myRadButton
	# ridefinisco la callback
	def on_clicked(widg, ind, *data):
		ena = widg.get_active()
		if ena:
			print "b", "%05s" %widg.props.label.replace('_',''),
			print ind, data
	# xBox, [butt,call] * N
	obje, othe = myRadButList(name=["One","Two","Three"],
							  chil=None, valu=1,
							  call=on_clicked, data=[],
							  tBox='h', aBox=[False, False, 1])
#myFrame
	# fram,[labe,xBox]
	obj1, oth1 = myFrame(name='select', obje=obje, colo='black',
						 bord=2, shad=Gtk.SHADOW_ETCHED_OUT,
						 tBox='v' )
	#debug
	myViewObject(obje, othe)
# <-
	return obj1
Se proviamo ad avviare il test vedremo:
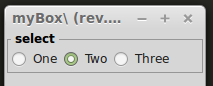
testRadButList in esecuzione.
myRadButLisLabel
Come per i check buttons anche qui ho realizzato la stessa lista ma con una label in testa che può tornare utile in alcune situazioni
#-----------------------------------------------------------------------------
# myRadioButtonListLabel
#-----------------------------------------------------------------------------
def myRadButLisLabel(name=["One","Two","Three"],
					 chil=None, valu=False,
					 call=None, data=['dati'],
					 nLab='Label', cLab=None,
					 tBox='h', aBox=[False, False, 1]):
	"""     nLab name
			cLab color
	"""

	#callback debug
	def on_clicked(widg, ind, *data):
		ena = widg.get_active()
		if ena:
			print "a", "%05s" %widg.props.label.replace('_',''),
			print ind, data

	# in assenza di callback uso quella di debug
	if call == None:
		call = on_clicked

	# funzione che istanzia oggetti tipo
	def myList(ind):
#myRadButton
		# butt, call
		return myRadButton(name=name[ind],
						   chil=chil, valu=False,
						   call=call, data=[ind, data])
#myBoxList
	# xBox, [butt, call] * N
	obje, othe = myBoxList(name=name, tBox=tBox,
						   aBox=aBox, func=myList)
	# prendo come capogruppo la prima istanza
	gro = othe[0][0].get_group()
	for ele in othe[1:]:
		# imposto il capogruppo alle altre istanze
		ele[0].join_group(gro[0])
	# rendo attivo il button
	if type(valu) == type(1):
		othe[valu][0].set_active(True)
#myLabel
	if cLab == None:
		cLab='blue'
	#name='myLabel', leng=0, prea=' ', post='', font='Arial 10', colo=Gdk.color_parse('black')
	labe = myLabel(name=nLab,
				   leng=len(nLab)+1, prea=' ', post=' ',
				   font='Courier 10',
				   colo=cLab)
	# inserisco la label nella list degli oggetti
	othe.insert(0,[labe])
	# inserisco la label in testa alla box
	#child, expand=True, fill=True, padding=0
	obje.pack_start(labe, False, False, 0)
	obje.reorder_child(labe, 0)
# <-
	return obje, othe
testRadButLisLabel
def testRadButLisLabel():
#radButton
	# ridefinisco la callback
	def on_clicked(widg, ind, *data):
		ena = widg.get_active()
		if ena:
			print "b", "%05s" %widg.props.label.replace('_',''),
			print ind, data
	# xBox, [labe, [butt, call] * N]
	obje, othe = myRadButLisLabel(name=["One","Two","Three"],
								  chil=None, valu=2,
								  call=on_clicked, data=[],
								  nLab='Label', cLab=None,
								  tBox='h', aBox=[False, False, 1])
#myFrame
	# fram,[labe,xBox]
	obj1, oth1 = myFrame(name='myButton', obje=obje, colo='black',
						 bord=2, shad=Gtk.SHADOW_ETCHED_OUT,
						 tBox='v' )
	#debug
	myViewObject(obje, othe)
# <-
	return obj1
Se proviamo ad avviare il test vediamo:
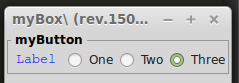
testRadButLisLabel in esecuzione.
Nota
Vi invito per lo studio dei nostri widgets di avviari gli scripts sempre da terminale. Così potete visualizzare i messaggi in uscita fatti ad hoc per i nostri test.
Package
La struttura aggiornata del nostro package è la seguente:
l00_start.py
l01_startGtk.py
my00init.py
myWidg/
  __init__.py
  my00init.py
  my00initGtk.py
  my01Box.py
  my02Label.py
  my02Entry.py
  my02TxtView.py
  my03Button.py
  my03RadButton.py
  myWind.py
  myApp.py
Per scaricare la nuova versione 20150904.zip
Saluti
Per oggi mi fermo qui.
Nel prossimo post vedremo la nostra prima applicazione reale.
Ciao alla prossima. (stay tune!)